 Almost half a year after announcing it,BlackBerry has finally officially launched its other BB10 smartphone,the Q10.The phone has a hefty price tags of Rs 44,990, which makes it more expensive than BlackBerry's flagship smartphone,the Z10.The Q10 is blend of BlackBerry's traditional keyboard and the touchscreen interface of the Z10.It bings an HD display, a dual-core processor and an 8-megapixel camera in a well-designed body that feels good to hold.
 /india-vs-pakistan.
india-vs-pakistan.
sachin-tendulkar-man-who-became-god.
sachin-tendulkar-man-who-became-god
india-vs-england-2012-2nd-t20i-preview.
india-vs-england-2012-2nd-t20i-preview.
sehwag-gambhirs-smug-overconfidence.
sehwag-gambhirs-smug-overconfidence.
all-proteas-players-to-be-given-game.
all-proteas-players-to-be-given-game.
Showing posts with label expensive. Show all posts
Showing posts with label expensive. Show all posts
Monday, July 22, 2013
BlackBerry Q10 launched in India
 Almost half a year after announcing it,BlackBerry has finally officially launched its other BB10 smartphone,the Q10.The phone has a hefty price tags of Rs 44,990, which makes it more expensive than BlackBerry's flagship smartphone,the Z10.The Q10 is blend of BlackBerry's traditional keyboard and the touchscreen interface of the Z10.It bings an HD display, a dual-core processor and an 8-megapixel camera in a well-designed body that feels good to hold.
 Sunday, July 7, 2013
How to create a Blog
12:52 AM
Earn Money, expensive, how to create a blog, Internet, introduction, Latest, points, posting, weblog, website maker
No comments
A blog is an easy-to-create web sites that allows users to share their thoughts with the world.The word "blog" comes from "Weblog" because because a blog consists of a signed and dated log of individual postings.The topic of the blog can be anything,from personal to professional.A blog is what you make of it.
- Open the site www.blogger.com.The Blogger site will open.
- To create a blog with the blogger site, you must have your account (e-mail) in gmail,else,you will have to create a new Gmail account.
- Sign in using your Gmail username and password.
- Specify a title for your blog ,say creative Expressions.The title will appear at the top of every page of your blog.The title should reflect about the contents in your blog.
- Specify the URL(address) of your blog, say ridhimabhatia.Your blog address (URL) will be your identity on hte web and it will be used to read and link to your blog.Click Continue.
- Your blog has been created.To add content to your blog,click on Start Blogging.
- The Posting page of your blog will be displayed.
- Under the Posting tab,you can enter the title for your blog post and the content(text,images,videos and web-links) for your posting.
- To format the text,use the toolbar shown just above the content window.This is almost similar to MS word toolbar.
- Click Publish Post after you have entered the content and formatted it properly.You will see the window on the next page.
- Click on View Blog button to view your own Blog.
- Similarly, you can add more contents to your blog by clicking on the Create a new post button.
- Specify a name in the Display Name text-box. This name will appear as you signature in the articles you will post on this blog.Click on Continue button.
- Different templates for your blog will be displayed.Select the template of your choice.The template choice can be changed later on.
- Click on continue button.The following screen will be displayed.

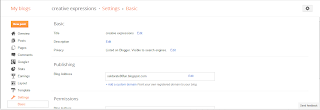
- You can use different menu options under the Settings tab to edit your profile, your blog address,invite others to view your blog or add them as members to your blog.
- To change the appearance of your blog.click on Design tab.You can change the template of your blog,add/modify/delete the page elements of your blog.
- After making the necessary changes,click on the Sign out button at the top right.
- To view your blog, type your URL,For example:(ridhimabhatia.blogspot.com) and press the enter key.Your Blog will be displayed.

- To add or modify the content in your Blog,or to make changes in the blog structure,click on the Sign In button at the top right of your blog window, or open the site www.blogger.com
- Sign in with your username and valid password.
- The Dashboard page will be displayed.the dashboard is an area which contains all the options for managing a blog.
- Click on New Post to add new entries in your blog, or click on Edit Posts to make changes in your existing posts.
- Always,remember to Sign out while leaving your blog site.
Subscribe to:
Comments (Atom)


