/india-vs-pakistan.

india-vs-pakistan.

sachin-tendulkar-man-who-became-god.

sachin-tendulkar-man-who-became-god

india-vs-england-2012-2nd-t20i-preview.

india-vs-england-2012-2nd-t20i-preview.

sehwag-gambhirs-smug-overconfidence.

sehwag-gambhirs-smug-overconfidence.

all-proteas-players-to-be-given-game.

all-proteas-players-to-be-given-game.

Showing posts with label Blogger. Show all posts

Friday, July 26, 2013

How to add Facebook "like" button to your blog or blogspot

To have a like button,you must have your Facebook page first.
  1. First,follow the link https://developers.facebook.com/docs/reference/plugins/like/
  2. Fill the required information and click on Get code.
Now follow the steps:

  • Get the like button.


  • When you fill the required information then click on generate code button.then a box will appear on your screen.look like this.
  • Then you copy the first code and simply paste in on the <body> section of your page.
  • Then copy the second code for plugin the page will appear.

Add FIVE cool and mashable type social sharing button to your blog.

If you have blogger account then 
blogger.com>sign in
Templates>Edit HTML
after pasting codes in <head>
Layout>HTML/JavaScript
and paste the below code to your blog or website.

Place these script tag in "HEAD" section of your HTML
<script type="text/javascript" src="http://w.sharethis.com/button/buttons.js"></script>

<script type="text/javascript" src="http://s.sharethis.com/loader.js"></script>
Now put these script at the end of your pageThey contain the parameter preferences in JSON format.

<script type="text/javascript">stLight.options({publisher: "5e1b23c7-e19f-44c1-85d1-69aede828cce", doNotHash: false, doNotCopy: false, hashAddressBar: true});</script>
<script>
var options={ "service": "facebook", "timer": { "countdown": 30, "interval": 10, "enable": false}, "frictionlessShare": true, "style": "7", "publisher": "5e1b23c7-e19f-44c1-85d1-69aede828cce"};
var st_service_widget = new sharethis.widgets.serviceWidget(options);
</script>

Thursday, July 25, 2013

Best 50 ways Blogger follow when begins or start:Beginners guide.

 Hey the bloggers every workers need to earn more money by any ways.But the blogging path is not difficult or not also easy.

  • Make Plans before launching your blog.
  • Choose your blogging niche wisely, choose a niche in which you are expert.
  • Register a simple, unique and easy to remember domain name for your blog
  • Signup with some affordable and cheap WordPress hosting like Hostgator or Bluehost.
  • Use WordPress, It’s the best blogging platform with lots of features than Blogspot
  • Choose a perfect, SEO friendly and fast loading theme for your blog. I recommend Elegant Themes and ThemeJunkie
  • Learn SEO, it is too important if you want to take your blog to the next level
  • Don’t copy from anyone else blog. Instead Post unique content on your blog.
  • Make a STRONG network around your blog niche, it’ll help you to increase online presence as well as will make you famous soon
  • Update Blog Regularly. Don’t just publish another blog post instead publish something that your readers would love.
  • Start blog commenting and write guest post for other blogs to increase website traffic, Backlinks and exposure
  • Don’t dream big, instead set up goals.
  • Don’t always get topics from other blogs.
  • Build an Mail list. It is really important. Use Madmimi email marketing service, it’s free up to 2.5K subscribers and it’s too cheap as compared to mailchimp or aweber
  • Keep your posts simple. Write for readers not search engines. Because readers are the one who can make your blog post go viral.
  • Be kind towards your readers. Solve their problems, provide them freebies.
  • Blogging is not an overnight success. It require lot of time, efforts and hard work.
  • Don’t overload your blog with widgets. Use clutter free theme
  • Make your blog SEO friendly. Use premium themes and plugins like SEOPressor for WP
  • Link to other blogs in your niche more often, in return they would do the same!
  • Ask opinions about your blog from it’s readers (like I did)
  • Reply to every comment on your blog. It’s important!
  • Reply to almost every email that you get in your inbox from your blog readers, try to help them as much as you can.
  • Don’t use too many ads on your blog, remember your readers want to learn something new, they don’t just want to see ads on your blog.
  • Don’t copy others images to add them on your blog instead create your own images or use any free sites to get images for your blog posts
  • Quality of your content matters, not quantity. Write awesome content and detail article.
  • Subscribe to other blogs in your niche. Don’t just focus on your blog instead do focus on other blogs as well. If you follow this, your blog will be successful in short time.
  • Add useful pages in your blog like About, Contact, Archives and Privacy related.
  • Make Subscribing, Commenting and Contacting on your blog easier. Award your commentator as well.
  • Don’t quit blogging if you don’t not earning enough. Instead use blogging to learn new things and to build your name around. Blog to help people, not ‘just’ to earn.

How to add a form on a blogspot

To add a form on the blogspot,follow the steps:
  • First open the site www.google.com.Then at the top there is a "Drive" option.click on it.
  • When the page will open,at the top,there is a Create  option,open it,Then there are many document to make,Then see that there is a 'form' option.click on it.

  • Then there is a lot of forms to choose,chose the form which you liked.Then a page will display filled the required box and click on'Send form' button.

  • After clicking it a box will appear on the screen look like this:

  • Then click on the Embed after the link to share now you will get a code,paste that in your blog.


Tuesday, July 23, 2013

Why bloggers fails to build their own blog readership.

Blogging needs efforts to grow and build its value for both readers as well search engines.
Just receiving traffic is not the goal of any blogger. The thing which we need is a powerful readership around our blog.
We need readers to read our content not just visitors who come and go back to another place for the information they are looking for.
One more thing we all know that readership is based on traffic. If you are receiving decent traffic then there are major chances to build readership. But readership is not totally dependent on traffic.
It depends on many factors which I’ll discuss today in this post and the reasons why bloggers fail to build strong and powerful blog readership.5 Reasons Why You Fail To Build Your Blog Readership
5 Reasons Why You Fail To Build Your Blog Readership
1. Writing Content for Search Engines
Most of newbie bloggers, when they start their blog, start posting anything they like to post without any proper knowledge of how to right best content.
Your content should not target the search engines. Try to right something under your niche that your readers like to read. If they like your content then they bring new traffic to your blog and also convert from visitors to readers.
12 Tips For Writing Engaging Content For Readers
2. Not Active on Social Media Sites
Social Media sites have proved themselves that they have the audience which you want for your business.
There are millions of regular visitors on major social media sites like facebook, twitter and now on Google Plus too. If you are not active on these great sources of traffic sites then you are really missing targeted audience as well valuable readers.
3. Poor Relationships with Existing Readers
I have examined many blogs where nobody is there to solve reader’s queries and doubts.
Blog owners just post content and sit relax.
They never take interest to communicate with their readers by replying to their comments. If you are also doing same then start communicating today with your readers because readers at early stage of blog are very important.
You should not ignore them if you are serious for your blogging goals.
4. Not Participating in Blogger’s Communities
Blogger’s communities and forums are one of the best sources of receiving targeted audiences.
There are numberless readers who are communicating from each other to share their views and ideas on particular topic. If you are not participating in those communities then really you are not fairing with your blog.
Generating quality content for your blog is not enough if you are not able to reach it to the correct audience. There are lot of big blogs with a strong readership and you have to target those readers. Start participating today in below best blog communities and forums to gain more exposure for your blog.
Bloggers.com
BlogAdda.com
IndiBlogger.in (An Indian Blogger’s Directory)
Forums.DigitalPoint.com
SitePoint.com/forums
5. Poor Consistency
One of the main reasons to fail to maintain blog readership is the consistency by which you are updating your blog.
You may be heard that we should post regularly to increase blog traffic but if you are not consistent with your blogging timings then you can never taste the real readership.
Your readers should be aware with your posting timings so that they can land on your blog at that time to read what you have written new in your blog. It will not only increase your blog readers but also you will gain trust of readers and search engines also by showing that you are really serious about your blog.
7 Blogging Mistakes that Can Stop Your Blog Growth
Final Words!
These were the 5 major reasons you may be failed to build a true readership for your blog.
If you feel that you are not working on any of the above strategies then start working today on it.
Check out the post here to learn how to build powerful online presence /readership and make blog successful in short time.
Believe me you will be happy with the results you will get after being active on these 5 hot reasons. Happy Blogging!

How to add a CSS code on blogger website

The following are the ways to add CSS code :


  • Open the site www.blogger.com


  • After sign in,click on the layout option on the Dashboard.


  • Click on the Template Designer on the top of layout page.


Suppose,this is a CSS codes of CSS 3D filps.Now copy(ctrl+c) tis code.
  • <style>


  • div.flip{
  • position:relative;
  • width: 300px; /* Set default width of flip */
  • height: 250px; /* Set default height */
  • -webkit-perspective: 600px; /* larger the value, the less pronounced the 3D effect */
  • -moz-perspective: 600px;
  • -o-perspective: 600px;
  • perspective: 600px;
  • }


  • div.flip div.rotate{
  • width: 100%;
  • height: 100%;
  • -moz-transform-style: preserve-3d; /* Specify all child elements inside this DIV maintain the same perspective */
  • -webkit-transform-style: preserve-3d;
  • -o-transform-style: preserve-3d;
  • transform-style: preserve-3d;
  • -moz-transition: all 0.6s ease-in-out 0.3s; /* final 0.3s specifies delay before effect kicks in */
  • -webkit-transition: all 0.6s ease-in-out 0.3s;
  • -o-transition: all 0.6s ease-in-out 0.3s;
  • transition: all 0.6s ease-in-out 0.3s;
  • }

  • div.flip div.rotate > *{ /* Target all children elements */
  • position:absolute;
  • width: 100%;
  • height: 100%;
  • -moz-backface-visibility: hidden;
  • -webkit-backface-visibility: hidden;
  • -o-backface-visibility: hidden;
  • backface-visibility: hidden;
  • }

  • div.flip div.rotate > div{ /* Target all child DIVs */
  • -webkit-box-sizing: border-box; /* Specify that any border/ paddings do not add to the DIV's total width */
  • -moz-box-sizing: border-box;
  • box-sizing: border-box;
  • padding: 8px;
  • background: #eee;
  • }

  • div.rotate.x *:nth-child(2){ /* X Axis rotate specific CSS. Rotate 2nd child DIV 180deg in the X axis */
  • -moz-transform: rotateX(180deg);
  • -webkit-transform: rotateX(180deg);
  • -o-transform: rotateX(180deg);
  • transform: rotateX(180deg);
  • }


  • div.flip:hover > div.rotate.x{ /* X Axis rotate specific CSS. Rotate div.rotate.x when mouse rolls over container */
  • -moz-transform: rotateX(180deg);
  • -webkit-transform: rotateX(180deg);
  • -o-transform: rotateX(180deg);
  • transform: rotateX(180deg);
  • }


  • div.rotate.y *:nth-child(2){ /* Y Axis rotate specific CSS. Rotate 2nd child DIV 180deg in the Y axis so it mirrors the first */
  • -moz-transform: rotateY(180deg);
  • -webkit-transform: rotateY(180deg);
  • -o-transform: rotateY(180deg);
  • transform: rotateY(180deg);
  • }


  • div.flip:hover > div.rotate.y{ /* Y Axis rotate specific CSS. Rotate div.rotate.y when mouse rolls over container */
  • -moz-transform: rotateY(180deg);
  • -webkit-transform: rotateY(180deg);
  • -o-transform: rotateY(180deg);
  • transform: rotateY(180deg);
  • }

  • </style>


  • Now paste this code on the CSS box.


Monday, July 22, 2013

Amazon Kindle Fire HD now available in India

Amazon's Kindle Fire HD tablets went on sale in India last month.Both the 8.9-inch and 7-inch versions of the tablet are available on Amazon.in.While the Kindle Fire HD 8.9 will sport a price tag of Rs21,999, the 7-incher will come in at Rs 15,999.With HD displays(the 8.9-inch tablet comes with a full HD resolution display),laminated touch sensors and powerful dual-core processors,Kindle is looking seriously at the Indian e-book reader market.And with the one-free-app-a-day policy, the Indian customer might just take up to the Amazon Appstore.

Saturday, July 20, 2013

CANON,For ultra wide shots

Canon has launched its new ultra wide-angle lens EF-M11-22mm f/4-5.6 is STM for EOS M mirrorless cameras.The EF-M11-22mm is an ultra wide-angle zoom lens useful in different scenarios.The fact that it has to be used in more compact EOS M cameras, a lens-retraction mechanism has been used to shorten the size of the lens to 60.9*58.2mm while being carried.Canon says the lens achieve superb optical performance because of the use of two  aspheric lenses and an Ultra-Low Dispersion (UD)lens.This arrangement and a special coating on the lens minimises flare and ghosting.An Image Stabilizer has been incorporated into this lens,giving the equivalent effect of a 3 stops faster shutter speed.For smoother soft-toned backgrounds,Canon has incorporated a 7-blade Electromagnetic Diaphragm with a circular aperture.The lens has been designed with videography in mind too.

ASUS,Motherland for the new era.

PRICE:Rs20,400

ASUS has launched the new TUF series motherboards based on the Intel Z87 Express Chipset for fourth-generation Haswell processor.the ATX Sabertooth Z87 is the more high-end of the two new boards and features Asus's new Thermal Radar 2 technology for real-time temperature detection.In addition to board-embedded sensors,three thermistor cables are bundled with Saberbooth Z87, so users can manually verify heat levels for the graphics card,hard drives,DRAM and other components.Dust Defender enclosures guard more I/O ports,expansion slots,and memory slots compared to the last-gen Z77 offerings.In addition,Asus also launched the micro-ATX Gryphon Z87,which has a price tag of Rs 14,200.

Friday, July 19, 2013

NORTON 360 MULTI-DEVICE

A good buy if you want a security solution for all your devices.

Norton 360 Multi-Device includes Norton 360 premiere for Windows PC,Norton Internet Security for Mac and Norton Mobile Security for Android and iOS devices.This suite offer protection for any combinations of devices;the number of devices depends on the package you have opted for.The suite requires you to create a Norton account.You can then log-in to your account from the other devices you want to install the software on and download the installation files.
      The PC version's interface is quite simple and is easy to navigate.The home screen provides a snapshot of your PC's status, and there are four large icons:Security,Identity,Backup and Tune-up.You can tweak the basic setting for every functions from each of these tabs;power users can access more advanced settings from the Settings tab.The Security tab lets you perform scans,update the virus definitions,and manage firewall settings.The Identity tab ensures safe surfing,provides protection against phisings, and warns you of malicious sites.The backup tab allows you to backup your data to the cloud,local drive or removable media;you can even schedule backups.Norton gives you 25GB free storage space on its cloud,but you can buy more space it you want.The Tune-up label helps you maintain and boost your PC's performance.

Thursday, July 18, 2013

XOLO Q700

Lava International's Xolo Q700 has been priced very comfortably below the Rs 10,000 bracket.A unique features this smartphone brings is multiple profiles,which is usually seen on the tablet version of Jelly Bean.The phone sports a 1.2 GHz quad-core processor, an IPS display,and runs android 4.2 Jelly
Bean.The Xolo Q700 is a dual-SIM smartphone.
    The Xolo Q700 is 4.5 inches tall and has quite a rugged chassis.It has an all black-exterior with a glossy screen and shiny frame edges,while the rear panel has a matte-finished texture.The front panel is dominated by the OGS touch screen panel.The chassis has a dark chrome trim,which,along with the rear panel,looks like the phone is placed in a protective hard shell or back cover.It is infact a single piece that
looks good,but is not very comfortable to hold.the screen bears a qHD resolution of 540x960 pixels.
         The graphics processor featured here is a PowerVR SGX544,which should be enough for playing HD content and 3D games.You get 4GB of internal storage space,but you get a microSD card slots that accepts cards up to 32GB in size.The rear houses a 5-megapixel camera with an LED flash that is quite good.Outdoor slots are good and sport a good balance in detail,brightness and contrast.Macro Shots
taken indoors are not as good as compared to the ones taken Outdoors.To sum it up, the camera is definitely better than those of most low-budget smartphones we have reviewed so far.On the connectivity front,you get Wi-Fi B/G/N, 3G support, a microUSB port and Bluetooth 3.0. 

Twitter's popular video sharing app,Vine.

Twitter's popular video sharing app,Vine,is finally available for android devices.The app lets you create looping. GIF-like videos that can be a maximum 6 seconds long,and share it on Twitter at the Vine community.
      You need to log-in/Sign-up with your e-mail ID or Twitter account before you can use the app.The user interface is simple and resembles that of the Twitter app.it's divided into four Sections.Feed,Activity,Explore and Profile.You can follow your friends by signing-in to Twitter or invite them via text or email.
        Initially,the app shows you editor's picks and trending videos, but once you connect with friends,you can view their videos in the Feed section.
      The video recording item is located on the upper-left and lets you record videos by tapping on the screen.The app records as long as you maintain contact with the screen, and then stitches the scenes together.The
screen shows a 6-second status bar,and you can stop recording whenever
you want.
             Unlike the iOS version, Vine for Android doesn't let you record with the front-facing
camera.Once you shoot a video,you can add a caption and post it to Vine or Twitter,but you
can't share it on Facebook.The app takes some times to initialise before it starts and completes recording the videos.We found the app to be a little sluggish and buggy on a few phones,but it ran fine on other devices.
         Though Twitter has announced that all the features present on iOS version of the app will soon be made available to the Android app by way of updates,we hope they do so quickly.In a nutshell,
Vine for Android is interesting,fun and highly addictive,but leaves much room for improvement.However,we're sure it'll be up to the mark soon enough.

Thursday, July 11, 2013

How to add Facebook recommendations Bar in Blogger Blog or Websites.

Recommendations Bar

The recommendations bar lets people like content, get recommendations and share what they’re reading with their friends.
The recommendations bar is always docked to the lower right or left of the screen. When the page loads the recommendations bar is collapsed and people viewing it are shown the option to like your page.
As people navigate toward the end of your page, the plugin expands. The expanded view displays a social recommendation of the next article to read on your site.
You must include Open Graph markup on your stories so Facebook knows how to display them on the site. If you do not include this, the plugin will show an error message instead of a recommendation.

Expanding the plugin

The plugin is expanded once the trigger parameter requirements are met, and the person has been on the page for at least the duration specified in the read_time parameter. There are three values for the trigger parameter:
  • onvisible. The plugin is expanded when people scroll past the exact point where the <fb:recommendations-bar /> tag is placed on the page. This is the simplest option and will work best if you place the tag right at the end of your article's main content. This is the default.
  • X%, where X is any positive integer less than or equal to 100. This specifies the percent of the page that must be scrolled before the plugin is expanded. For example: 100% would indicate that people need to scroll all the way to the end of the page before the plugin expands. 50% indicates that people need to scroll to the middle point of the page.
  • manual. Use this option to manually trigger the plugin. When you want to trigger the plugin, callFB.XFBML.RecommendationsBar.markRead(href); in JavaScript. The href parameter is optional and will default to the current page if not set. If provided, it must match the href parameter on the XFBML tag. The manual trigger is useful when you have more a multipage article. For example on a three-page article, you would add trigger="manual" on pages one and two and never call the markRead JavaScript function on those pages.
The read_time parameter tells the plugin to wait a certain amount of time before it expands. It takes an integer representing the number of seconds. By default this will be set to 30 seconds. The minimum is 10 seconds. Note that in order for the plugin to expand, the trigger condition must be true, and the read_time must be met.
Hey Guys these things which you want know is become famous now a days because every person or blogger want more to famous and this helps you and your blog to famous.Facebook is such a best social networking site where we connect with our friends and family also.On that path Facebook is also providing you to create a page and know how many persons like you and what ever you make page related with.You know Facebook is becoming a part of Websites or blogger because they provides us very good faculty i.e why all peoples or blogger want Facebook like box,Facebook like button,Facebook comment box and much more.Here we know that how to add recommendation bar in your blog or websites.
Do some following steps.
Go to following link:  https://developers.facebook.com/docs/reference/plugins/recommendationsbar/       
Then their some picture like this:
By filling this form you get code like this:

Just paste the codes to your websites or blog then a like box comes in your blog like this:

Attributes

  • href - the URL of the page. The XFBML version defaults to the current page.
  • trigger - when the plugin expands. Note that this parameter is evaluated in addition to the read_time parameter. Default is when a user scrolls past the <fb:recommendations-bar/> tag. There are three options.
    • onvisible - read is published when a user scrolls past the exact point where the XFBML tag is placed on the page.
    • X% - where X is any positive integer less than or equal to 100. Indicates % of page scrolled past before read is triggered
    • manual - use this option to manually trigger the read action. You callFB.XFBML.RecommendationsBar.markRead(href); when you want the plugin to expand. The href parameter is only necessary if the <fb:recommendations-bar/> tag includes an explicit href attribute. By default, this is the current request URL.
  • read_time - The number of seconds before the plugin will expand. Default is 30 seconds. Minimum is 10 seconds.
  • action - The verb to display on the button. Options: 'like', 'recommend'
  • side - the side of the screen where the plugin will be displayed. This will automatically adjust based on the language, or can be set explicitly. Options: 'left', 'right'
  • site - a comma separated list of domains to show recommendations for. The default is the domain of the href parameter.
  • ref - a label for tracking referrals; must be less than 50 characters and can contain alphanumeric characters and some punctuation (currently +/=-.:_). The ref attribute causes two parameters to be added to the referrer URL when a user clicks a link from a stream story about a Like action:
    • fb_ref - the ref parameter
    • fb_source - the stream type ('home', 'profile', 'search', 'other') in which the click occurred and the story type ('oneline' or 'multiline'), concatenated with an underscore.
  • num_recommendations - the number of recommendations to display. By default, this value is 2 and the maximum value is 5.
  • max_age - a limit on recommendation and creation time of articles that are surfaced in the plugins, the default is 0 (we don’t take age into account). Otherwise the valid values are 1-180, which specifies the number of days.

How to Check blogger stats or know from where country my blog is seeing.

Hey guys you are very interested to know about how to check your blogger stats or from where country peoples see your blog or blog post.This busy world has created some difficult things and give you a chance to make money online i.e why people entered in blogger.com to create blog and put ads of Adsense and earn money.Google is creating a good thing for those peoples who are interested in making websites and also to give knowledge to others for free.So, those peoples who have blogs are interested to know that from where country peoples saw their blogs.
Not wasting to many time we have come to point.You have blogger account.First follow these steps which are given below:

  • Blogger.com sign in
  • SELECT YOU BLOG
  • Stats and then audience.
You are able to see the stats from where people see your blog.This people generally want because they want to know that is my blog is famous in this world or not.If your blog is seeing outside your country that is good sign for your blog and for you also.
Blogger is a such a great source for everything its means that if you are blogger you will make money,you will   give knowledge to others,You become famous and much more.Blogging is a great source for providing knowledge to many peoples,students and husbands-wife creating their life better due to use of blogger and make a blog.
Today more than 50,000 peoples are interested in blogger and they making to many blogs the rating of blogs is more that 4.00.000.

Wednesday, July 10, 2013

How to add Facebook Comment Box to your blog or websites.

Comment Box.
The Comments box is a social plugin that enables people to comment on your site. Features include moderation tools and distribution.
Social Relevance: The Comments box uses social signals to surface the highest quality comments. Comments are ordered to display the most relevant comments from friends and friends of friends as well as the most-liked or active discussion threads. Comments marked as spam are hidden from view.
Distribution: Comments are easily shared with friends or with people who like your Page on Facebook. If people leave the “Post to Facebook” box checked when they post a comment, a story appears on their friends’ news feed indicating that they've made a comment on your website, which will also link back to your site.
Friends and people who like the Page can then respond to the discussion by liking or replying to the comment directly in the news feed or in the Comments box on your site. Threads stay synchronized across Facebook and on the Comments box on your site regardless of where the comment was made.
The mobile version will automatically show up when a mobile device user agent is detected. You can turn this behavior off by setting the mobile parameter to false.
Note:The mobile version of the Comments box ignores the width parameter, and instead has a fluid width of 100% in order to resize well in portrait/landscape switching situations. You may need to adjust your CSS for your mobile site to take advantage of this behavior. If you prefer, you can still control the width via a container element.
You are putting Facebook Comment Box in your websites or blog by two ways.
First through Your Facebook Developers and another through the help of this website.
You have Facebook Account Sign to your Facebook Account> and then click on this https://developers.facebook.com/docs/reference/plugins/comments/
And you have some figure like this:
You have to put your website name on URL to comment on(?)
And then click on get code button you have some picture like this:
Paste the following code in your websites or blog.
If you have blogger account do following steps:
Blogger account sign in> Layout
Html/ Java Script
And paste the code which you get on your screen by doing above steps or paste this only replace our username with your username.
<div class="fb-comments" data-href="http://mylabofblogger.blogspot.in" data-width="470" data-num-posts="10"></div>


How do I know when someone comments on my site?

You can subscribe to the 'comment.create' and 'comment.remove' events through FB.Event.subscribe.

What does the grammar filter do?

  • Adds punctuation (e.g. periods at the end of sentences)
  • Trims extra whitespace
  • Expands slang words (e.g. plz becomes please)
  • Adds a space after punctuation (e.g. Hi,Cat would become Hi, Cat)
  • Fix common grammar mistakes (e.g. convert ‘dont' to ‘don’t’)
    You can enable the grammar filter from the settings section of the plugin.

How can I get an SEO boost from the comments left on my site?

The Facebook comments box is rendered in an iframe on your page, and most search engines will not crawl content within an iframe. However, you can access all the comments left on your site via the graph API as described above. Simply grab the comments from the API and render them in the body of your page behind the comments box. We recommend you cache the results, as pulling the comments from the graph API on each page load could slow down the rendering time of the page.

How do I enable users to comment using other login providers?

On the settings section of the plugin, you can choose to enable third party login on your comments boxes. Currently this will enable users to comment using a Yahoo!, AOL or Hotmail account.

How does the blacklisting words work?

You can enter blacklisted terms from the settings section of the comments box. The content of new comments is checked against the blacklist of terms to see if this comment should have limited visibility. The comment is checked via substring matching. This means if you blacklist the word 'at', if the comment contains the sequence 'a' 't' anywhere it will be marked with limited visibility; e.g. if the comment contained the words 'bat', 'hat', 'attend', etc it would be caught.

I have the first version of the Facebook Comments box, how do I upgrade?

If you are using the original version of the Facebook Comments box, just add 'migrated=1' to the <fb:comments> tag, and the comments box will automatically switch to the new version. In this case, you should not specify the href parameter, and you must keep the XID parameter the same. Once you migrate, you can access the comments as described above. Note that the moderation tools only work with the newer version of the comments plugin (with href specified instead of migrated=1).

If this post is helpful for you please comment and like our pages.
Your MyLabOfBlogger

Tuesday, July 9, 2013

How to add Facebook follow button to your blog or websites.

Hey guys you are very excited for putting Facebook follow button on your websites.You have to do simple steps for putting follow button in your websites.If you have blogger.com account you have to do some steps.
Go to Blogger.com>Layout
HTML/JAVASCRIPT
Paste the following code which you get from Facebook developers by learning from here.
This is what mylabofblogger do few steps before putting follow button on website.
You have facebook account if not create now ,then open
Facebook.com>https://developers.facebook.com/docs/reference/plugins/follow/
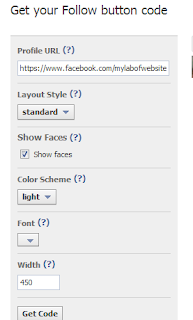
and you have same pictures as you see here.Only change profile URL with your profile username if you have page.If not create a page.
after that you are getting codes like this you have only to paste these codes to your websites or blog.


The Follow button was previously called the Subscribe button.

Follow Button


The Follow button lets other people follow your public updates on Facebook.

There are two Follow button implementations: XFBML and Iframe. The XFBML (also available in HTML5-compliant markup) version is more versatile, and requires use of the JavaScript SDK. The XFBML dynamically re-sizes its height according to whether there are profile pictures to display.
To get started, just use the configurator below to get code to add to your site.

Attributes

  • href - profile URL of the user to follow. This must be a facebook.com profile URL.
  • layout - there are three options.
    • standard - displays social text to the right of the button and friends' profile photos below. Minimum width: 225 pixels. Default width: 450 pixels. Height: 35 pixels (without photos) or 80 pixels (with photos).
    • button_count - displays the total number of followers to the right of the button. Minimum width: 90 pixels. Default width: 90 pixels. Height: 20 pixels.
    • box_count - displays the total number of followers above the button. Minimum width: 55 pixels. Default width: 55 pixels. Height: 65 pixels.
  • show_faces - specifies whether to display profile photos below the button (standard layout only). You must not enable this on child-directed sites
  • colorscheme - the color scheme for the plugin. Options: 'light' (default) and 'dark'
  • font - the font to display in the plugin. Options: 'arial', 'lucida grande', 'segoe ui', 'tahoma', 'trebuchet ms', 'verdana'
  • kid_directed_site - If your web site or online service, or a portion of your service, is directed to children under 13 you must enable this.
  • width - the width of the plugin.
Is this topic very helpful for you then please comment and like us on facebook.Thank you.

Saturday, June 29, 2013

How to add picture codes in blogger and website.

Hey guys this is very interesting that you want to make your website/blog very beautiful because the code which you want to got from here is very helpful you and your website also.You can put links,Changes the image from the code and also


Html pictures codes:


<img src="http://www.quackit.com/pix/milford_sound/milford_sound_t.jpg" style="max-width:100%" alt="Milford Sound in New Zealand" />

How to add comment box
How to add background images,color,
 scroll box background color in blogger or websites.
How to add music player with picture in blogger,website and also Play audio online.add a social stylish subscribe widget for blogger.How to add word press subscription box in Blogger.Html Codes for background color putiing in your website or blogger

How to add comment box with color and background picture.

Hey guys You are interested for putting codes in your website for that your website is looking good.
So,you have to follow some steps before put this codes in your website.

if you are a blogger:
Blogger>layout
html/javascript
Lastly copy and paste the below codes inside.

Comment box code :
<form action="/html/tags/html_form_tag_action.cfm" method="post">
Comments:<br />
<textarea name="comments" id="comments">
Hey... say something!
</textarea><br />
<input type="submit" value="Submit" />

</form>
Comment box colors:
<form action="/html/tags/html_form_tag_action.cfm" method="post">
Comments:<br />
  <textarea name="comments" id="comments" style="width:160px;height:90px;background-color:#D0F18F;">
  Hey... say something!
  </textarea><br />
  <input type="submit" value="Submit" />
</form>
Comment box pictures:
<form action="/html/tags/html_form_tag_action.cfm" method="post">
<textarea name="comments" id="comments" style="width:150px;height:150px; background:url('/pix/milford_sound/milford_sound_t.jpg');">
Enter your comments here...

...and watch your comment box grow scrollbars!
</textarea><br>
<input type="submit" value="Submit">
</form>


How to change or add html codes background color,background image,Fixed Background image, shorthand background code and backgrounds for the whole page

Hey guys now we know how to change background color with html elements.
The following examples use is CSS(Cascading style sheet).CSS is the best way for setting background.It's better than all other outdated methods.
You have only add this in your blogger by following ways :
  • Blogger>Layout
  • Html/Javascript
  • and paste the following codes inside which is given below.
Background color:
<div style="background-color:yellow;border:1px solid black;padding:10px;">
<p>HTML background code is limited, CSS background code is much better!</p>

</div>
example:

Background image:
<div style="background-image:url(/pix/smile.gif);
background-repeat:repeat;
width:200px;
height:200px;">
<p>HTML background code is limited, CSS background code is much better!</p>
</div>
Fixed Background Image:

<div style="background-image:url(/pix/smile.gif);
background-repeat:repeat;
background-attachment:fixed;
overflow:scroll;
width:200px;
height:100px;">
<p>HTML background code is limited, CSS background code is much better!
example shows how a background image can be set to a fixed position
- even though its containing block scrolls.</p>
</div>
Shorthand Background code:

<div style="background:url(/pix/smile.gif) repeat fixed;
overflow:scroll;
width:200px;
height:100px;">
<p>HTML background code is limited, CSS background code is much better!
example shows how a background image can be set to a fixed position
- even though its containing block scrolls.</p>
</div>


How to change and add scroll box background color in blogger or websites.

Hey guys here is code which you want from us,because we know that what you want.For putting a stylish scroll box in your blogger /website you have to do some following steps before putting codes.
In Blogger

  1. open blogger>Layout
  2. Html/Java Script
  3. And paste the below codes inside 


Basic HTML Scroll Box
<div style="height:120px;width:120px;border:1px solid #ccc;font:16px/26px Georgia, Garamond, Serif;overflow:auto;">
As you can see, once there's enough text in this box, the box will grow scroll bars... that's why we call it a scroll box! You could also place an image into the scroll box.
</div>


Background Color
This example changes the background color of the scroll box. In HTML, you change background color using the CSS background-color property:

HTML Code:
<div style="height:90px;width:150px;overflow:scroll;background-color:#67F152;">We have added a background color to this HTML scroll box. This is done using the CSS 'background-color' property.</div>
Html codes:
<div style="height:90px;width:150px;overflow:scroll;background-color:#67F152;color:#A6120D;">We have changed the color of the text inside this scroll box. We did this using the CSS 'color' property.</div>

Gamer City z

Free for your eye videos